
If your photos often come out blurry because your hands shake, you are not alone. Many beginners and even experienced photographers struggle with camera shake, especially in low light, while zooming in, or when using a heavier lens. The good news is that shaky hands do not have to ruin your photos.
This guide on how to fix shaky hands photography will walk you through simple, practical, and effective ways to reduce blur, improve stability, and capture crisp images with confidence. Whether you shoot on a smartphone, DSLR, mirrorless camera, or compact camera, these techniques will help you get sharper results right away.
Why shaky hands make photos blurry
Before learning how to fix shaky hands photography, it helps to understand why blur happens in the first place. When the camera moves while the shutter is open, the sensor records that movement as blur. This is called camera shake.
The problem becomes worse when:
- The shutter speed is too slow
- You are shooting in dim light
- You are zoomed in
- The lens or camera is heavy
- You press the shutter too hard
- You are standing in an unstable position
Even a tiny movement can soften a photo. That is why improving your hand stability and camera technique matters so much.
Read more:
1. Use a faster shutter speed
One of the easiest ways to fix shaky hands photography is to increase shutter speed. A faster shutter freezes movement, including the small movements caused by your hands.
As a general rule:
- For still subjects, try 1/125 sec or faster
- For portraits, try 1/160 sec or faster
- For telephoto shots, use a shutter speed at least equal to your focal length, or even faster
- For action, go much faster depending on the subject
For example, if you are using a 200mm lens, a shutter speed around 1/200 sec may be the bare minimum. In reality, 1/400 sec or faster often works better.
If your photos are blurry, check the shutter speed first. This is one of the most important fixes for shaky hands photography.
2. Improve your grip on the camera
How you hold your camera can make a huge difference. A proper grip helps you stay steady and reduces unnecessary movement.
Try this: The Ultimate Guide to the Gamestop Credit card (2026) — Is It Worth It for Gamers?
- Hold the camera with both hands
- Keep your right hand on the grip
- Support the lens from underneath with your left hand
- Keep your elbows close to your body
- Stand with your feet shoulder-width apart
This position creates a more stable base and makes it easier to hold the camera still. If you are using a smartphone, use both hands and tuck your elbows in rather than holding the phone away from your body.
A strong grip is one of the most underrated answers to how to fix shaky hands photography.
3. Brace your body against something solid
When your hands are not enough, let your body do the work. Leaning against a wall, tree, post, car, or table can greatly reduce camera shake.
You can also:
- Kneel down and rest your elbow on your knee
- Sit and brace your elbows on your thighs
- Place the camera on a railing or ledge
- Use a nearby object as a makeshift support
This simple habit can save photos in low-light situations where you cannot raise the shutter speed enough.
4. Use image stabilization
Many cameras and lenses include image stabilization or vibration reduction. On smartphones, this often appears as optical image stabilization or electronic stabilization.
Image stabilization helps counter small hand movements and can allow you to shoot at slower shutter speeds without blur.
Important note: stabilization helps, but it does not freeze subject motion. If your subject is moving, you still need a fast enough shutter speed.
Use stabilization when:
- You are shooting handheld
- Lighting is dim
- You are using a telephoto lens
- You need extra flexibility
If your camera or lens has this feature, turn it on. It can be a major help when learning how to fix shaky hands photography.
5. Use the burst mode wisely
Burst mode, also called continuous shooting, can increase your chances of getting one sharp frame. When you take several shots in quick succession, at least one is often sharper than the others.
This works especially well when:
- Your hands are slightly shaky
- You are shooting handheld
- The subject is moving
- You are using a long lens
Press the shutter gently and take a short burst of 3 to 5 frames. Do not hold the button too aggressively, because that can create extra movement. Instead, tap smoothly.
Burst mode is not a cure for bad technique, but it can improve your odds significantly.
6. Control your breathing
Professional shooters often use breathing techniques to steady their aim. This is a simple but effective trick for handheld photography.
Try this method:
- Take a deep breath
- Exhale slowly
- Pause briefly at the natural end of your breath
- Press the shutter gently during that pause
This small pause helps reduce body motion. It is especially useful when shooting portraits, still scenes, or long lens compositions.
Breathing control may sound minor, but it is one of the easiest ways to improve camera stability quickly.
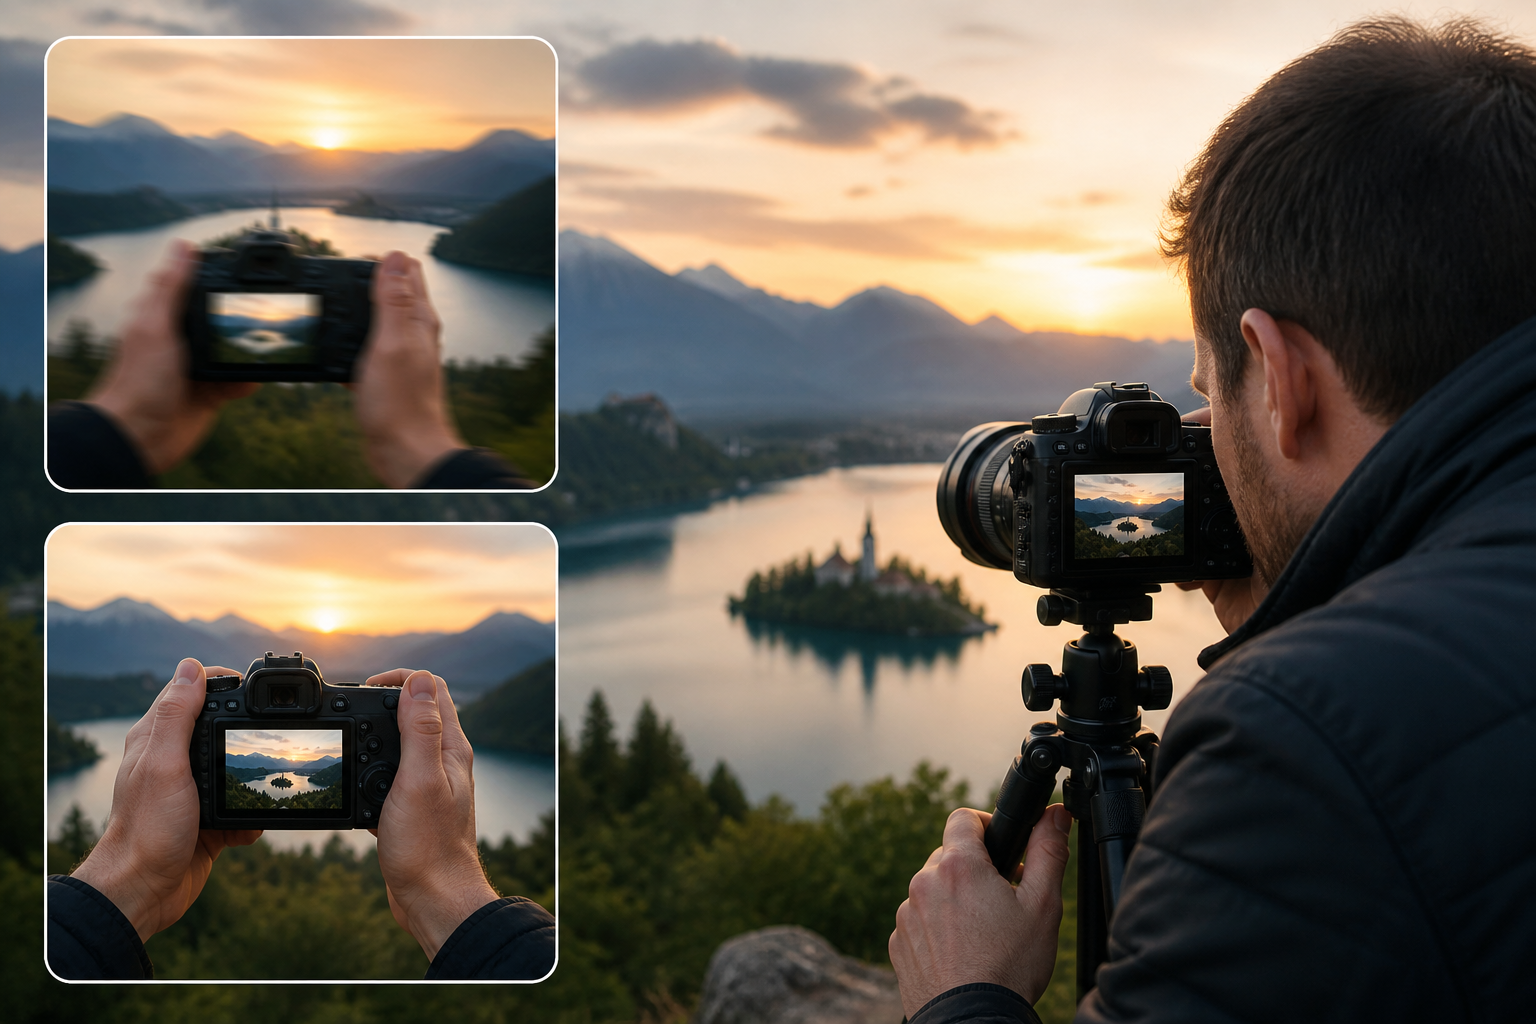
7. Use a tripod or monopod
If you frequently deal with shaky hands, a tripod can be a game changer. It removes hand shake almost completely and gives you a steady base for sharper photos.
A tripod is best for:
- Landscapes
- Night photography
- Long exposures
- Portraits
- Product photography
- Group shots
A monopod is useful when you want some support but still need mobility, especially for sports or events.
If carrying a tripod all the time is inconvenient, even a small tabletop tripod or flexible tripod can help. In the context of how to fix shaky hands photography, gear support is one of the most reliable solutions.
8. Raise your ISO when needed
Low light often forces your camera to use slower shutter speeds, which increases blur. Raising ISO helps your camera capture more light and allows for faster shutter speeds.
That said, ISO should be balanced carefully. Higher ISO can introduce noise, but a slightly noisy sharp image is usually better than a clean blurry one.
A smart approach is:
- Start with the lowest practical ISO
- Increase ISO only as needed to maintain a safe shutter speed
- Use noise reduction later in editing if necessary
This is especially useful indoors, at events, or at dusk. It is one of the most practical fixes for shaky hands photography when lighting is not ideal.
9. Use proper shutter release technique
Sometimes blur happens not because your hands are unsteady overall, but because you press the shutter too forcefully. A hard press can jolt the camera slightly.
To avoid that:
- Press the shutter slowly and smoothly
- Use the camera’s timer or remote trigger
- Use voice control if your device supports it
- Try touch shutter on a smartphone
Even a small tap can introduce movement, especially at slower shutter speeds. A gentle release can noticeably improve sharpness.
10. Shoot in better light whenever possible
Good light makes everything easier. In bright environments, your camera can use faster shutter speeds, lower ISO, and more reliable focusing.
If possible, move closer to windows, outdoors, or into brighter parts of a room. For indoor photography, turn on extra lights rather than relying on dim ambient light.
Better light means:
- Faster shutter speeds
- Less blur
- Cleaner images
- Easier focusing
If you want an easy win in how to fix shaky hands photography, improve the light before anything else.
11. Use the right lens for the job
Lens choice affects how much hand shake shows up in your images. Longer lenses magnify both the subject and your movement, which makes camera shake more noticeable.
For shaky hands, consider:
- Using a wider lens when possible
- Avoiding extreme zoom unless necessary
- Choosing lenses with image stabilization
- Using faster lenses with wider apertures
A lens with a wide aperture lets more light in, which helps you keep shutter speed high. This is extremely helpful for handheld shooting.
12. Edit carefully, but do not rely on editing alone
Editing can improve contrast, sharpness, and visibility, but it cannot fully rescue a blurred image. If the photo is severely shaky, software fixes will only help a little.
Still, you can make your sharper images look better by:
- Adjusting sharpening carefully
- Reducing noise
- Improving contrast
- Cropping slightly if needed
The main goal is to capture sharp images in camera first. Editing should be the finishing touch, not the rescue plan.
13. Strengthen your hands and reduce fatigue
If your hands shake often, fatigue may be part of the issue. Long shooting sessions, stress, caffeine, dehydration, or holding a heavy camera for too long can all make shake worse.
Helpful habits include:
- Taking breaks during long shoots
- Using a camera strap for support
- Avoiding overuse of the same hand position
- Staying hydrated
- Keeping your shoulders relaxed
Over time, better posture and endurance can improve stability. This is an often overlooked but valuable part of learning how to fix shaky hands photography.
14. Practice with a simple stability drill
You can improve hand steadiness with regular practice. Try this exercise:
- Stand in a relaxed position
- Hold your camera properly
- Point at a still object
- Take 10 photos at different shutter speeds
- Compare which settings give you the sharpest results
This helps you learn where your personal stability limit is. Everyone is different. Some people can shoot handheld at slower speeds than others. Practice will help you discover what works for you.
The more you practice, the easier it becomes to avoid blur automatically.
15. Know when to switch to support tools
Sometimes the best solution is simply not to fight your shaky hands. If the shot matters, use support tools instead of trying to force handheld shooting.
Great support options include:
- Tripods
- Monopods
- Gorillapods
- Bean bags
- Tabletop stands
- Camera cages
These tools are especially useful for travel, content creation, live streaming, and low-light work. There is no shame in using support. Professional photographers do it all the time.
Best settings for shaky hands photography
Here is a simple starting point for better handheld sharpness:
- Shutter speed: 1/125 sec or faster
- Aperture: as wide as needed for light
- ISO: raise it enough to protect shutter speed
- Stabilization: turn it on if available
- Focus mode: use reliable autofocus for moving subjects
- Drive mode: try burst mode for extra safety
This setup gives you a strong foundation for sharper handheld photos.
Common mistakes that make shake worse
Avoid these habits if you want sharper photos:
- Holding the camera with one hand
- Standing with locked knees and loose posture
- Using too slow a shutter speed
- Zooming in too much without support
- Pressing the shutter too hard
- Shooting in very dim light without adjusting settings
- Ignoring stabilization features
Fixing just one or two of these can make a noticeable difference.
FAQ: How to fix shaky hands photography
Why are my photos blurry even when I am standing still?
Your camera may be using a slow shutter speed, or your hand movement may be enough to blur the shot. Low light and zoom lenses make this worse.
Can image stabilization fix shaky hands completely?
No. It helps reduce minor shake, but it cannot stop subject motion or replace proper technique.
What is the easiest fix for shaky hands photography?
Use a faster shutter speed, hold the camera correctly, and shoot in better light. Those three changes solve many blur problems.
Does a tripod always solve the problem?
A tripod removes hand shake, but you still need proper focus, stable placement, and enough light for the scene.
Is burst mode useful for shaky hands?
Yes. It improves your chances of getting one sharp frame, especially when your hands are unsteady or your subject is moving.
Final thoughts
Learning how to fix shaky hands photography is not about having perfectly steady hands. It is about using the right combination of technique, settings, and support. Once you understand how shutter speed, grip, light, and stabilization work together, sharper photos become much easier to achieve.
Start with the basics: hold the camera properly, use a faster shutter speed, and shoot in better light. Then add tools like image stabilization, tripod support, and burst mode when needed. With a little practice, you will notice a big improvement in sharpness and confidence.
Shaky hands do not have to stop you from taking great photos. The right habits can turn blur into clarity and frustration into better results.